
Understanding the health of your motorcycle's electrical system is crucial for maintaining reliable performance and avoiding unexpected breakdowns. At the heart of this system lies the stator, a component that often goes unnoticed until something goes wrong. Testing your stator regularly can save you time, money, and the frustration of being stranded on the roadside. This guide will walk you through the essential steps for diagnosing electrical faults, ensuring your bike remains in top working order.
Understanding the Stator's Role in Your Motorcycle's Electrical System
What Does the Stator Do and Why Is It Essential?
The stator is a stationary part of your motorcycle's charging system, typically mounted within the engine casing. It consists of a series of coiled wires that interact with a rotating magnet, known as the rotor. As the engine runs, the rotor spins around the stator, generating alternating current electricity. This electrical energy is then converted into direct current by the regulator rectifier, which powers the motorcycle's lights, ignition, and other electronic components whilst recharging the battery. Without a functioning stator, your motorcycle would quickly drain the battery and lose the ability to run, making it an indispensable component for any ride.
The Relationship Between the Stator, Battery, and Alternator
In a motorcycle's electrical architecture, the stator works closely with the battery and the regulator rectifier, often referred to as the alternator assembly. The stator generates the raw electrical power, which the regulator rectifier then refines and directs to the battery. The battery acts as a reservoir, storing energy for starting the engine and smoothing out fluctuations in the electrical supply. When the stator begins to fail, it can no longer produce sufficient voltage, causing the battery to deplete rapidly and leaving the motorcycle unable to sustain operation. Understanding this interdependence is key to diagnosing electrical faults effectively, as issues with one component can easily masquerade as problems with another.
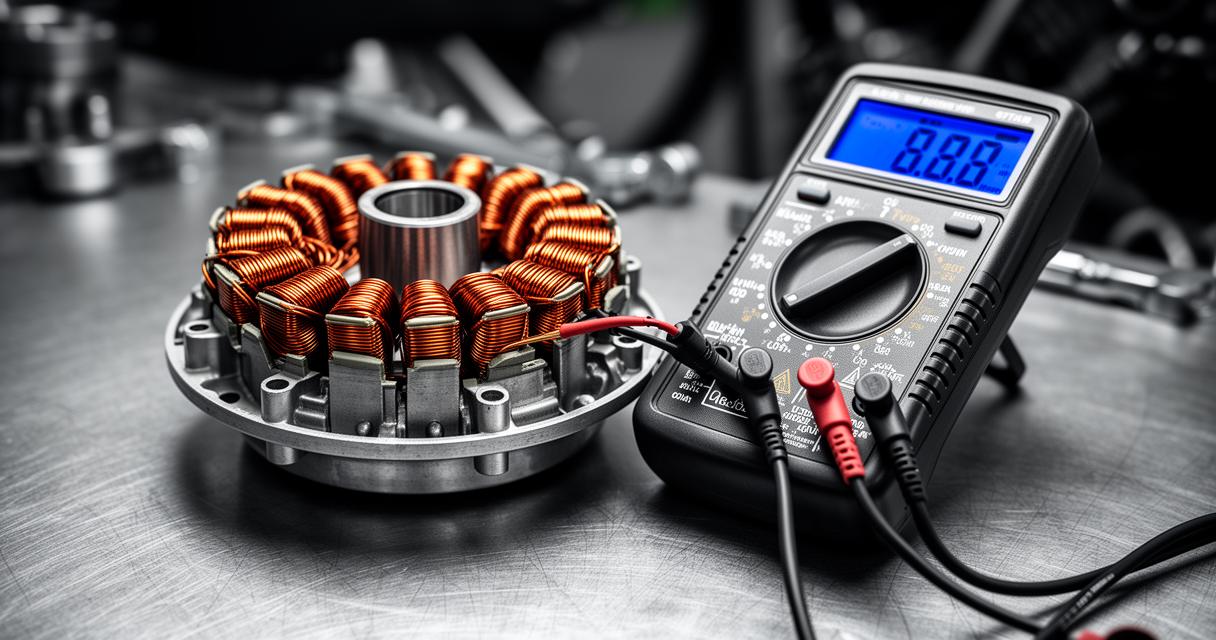
Essential Tools and Equipment for Stator Testing
Selecting the Right Multimeter or Ohmmeter for Accurate Readings
A reliable multimeter or ohmmeter is the cornerstone of stator testing. These instruments allow you to measure both voltage output and resistance within the stator's coils, providing critical data for diagnosing faults. When choosing a multimeter, look for a model that offers clear digital readouts and the ability to measure AC voltage, DC voltage, and resistance in ohms. Many motorcycle enthusiasts favour multimeters with auto-ranging features, as they simplify the testing process by automatically selecting the appropriate scale. Ensure your chosen device is accurate and well-calibrated, as even minor discrepancies in readings can lead to incorrect conclusions about your stator's condition.
Additional Tools to Have on Hand During the Testing Process
Beyond a multimeter, having a few additional tools can streamline the testing process and improve accuracy. A workshop manual specific to your motorcycle model is invaluable, as it provides wiring diagrams, resistance specifications, and voltage ranges unique to your bike. You may also benefit from a set of screwdrivers and socket wrenches to remove side covers or access panels, exposing the stator for inspection. A notepad or smartphone for recording readings can help track patterns over time, whilst a torch or inspection light ensures you can see clearly when working in tight or dimly lit spaces. Finally, keep a wire brush or contact cleaner nearby to ensure all terminals and connections are free from corrosion or debris, which can skew test results.
Recognising the Warning Signs of a Faulty Stator
Common symptoms indicating stator failure
A failing stator often announces itself through a variety of telltale symptoms. One of the most obvious signs is a battery that refuses to hold a charge, even after being recently replaced. This occurs because the stator is no longer supplying enough power to replenish the battery's energy reserves. You may also notice dimming headlights or flickering dashboard lights, particularly at lower engine speeds, as the stator struggles to produce adequate voltage. In some cases, the motorcycle may run erratically or stall unexpectedly, especially when electrical loads such as heated grips or additional lights are in use. Burnt or melted wiring around the stator, accompanied by an acrid smell, is another red flag indicating overheating or short circuits within the coils.
When to Schedule a Thorough Electrical System Inspection
Regular checks of your motorcycle's electrical system are essential for catching stator issues before they escalate into costly repairs. If you begin to experience any combination of the symptoms mentioned earlier, it is wise to conduct a thorough inspection as soon as possible. Additionally, older motorcycles or those with high mileage should have their stators tested periodically, as wear and tear can degrade the coils over time. Riders who frequently operate in harsh conditions, such as heavy rain or extreme temperatures, may also benefit from more frequent checks, as these environments can accelerate stator deterioration. By staying proactive and vigilant, you can identify potential problems early and ensure your motorcycle remains dependable for every journey ahead.